Finished Mittens

luvinthemommyhood 

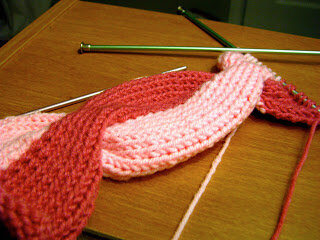
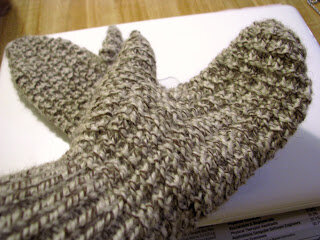
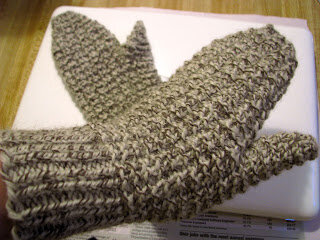
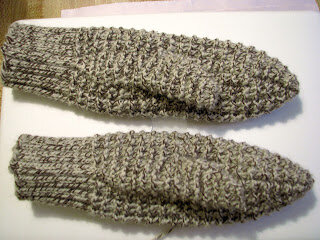
Yay!  Finished on time :]

It is definitely a small surprise for me, as I kept having to rip out half my work every couple of days, I wasn't sure if I would have *one* mitten done by the 8th.

And now I have *both* mittens done & ready to be worn a day early!


I took quite a few liberties with the Lithuanian mitten pattern I found in the Ultimate Mittens book I borrowed from the library.  For whatever reason (and most-likely because I was using needles 2 sizes too big) the mittens kept coming out way too large for my hands so I started tweaking with the numbers.

I thought I would include my notes for any others interested in trying this revised pattern.  Please note I DO NOT own this pattern & reserve all rights to the owners of the book.

Lithuanian Mittens, Revised
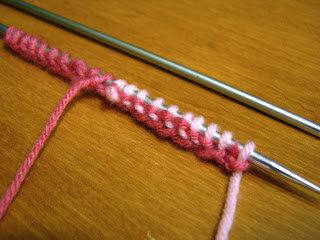
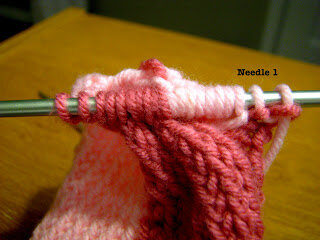
With size 3, double point needles, CO 39, splitting them 15, 12, 12.

*K2 P1, repeat, for 19 rows.

P around one row.

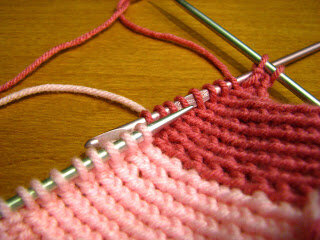
Begin new pattern: *K2, P1 for 2 rows; P around for 1 row.  Repeat from *

For every row that starts with K2, increase one stitch.  For example: Row 1 - K1 make 1 K1 P1, *K2 P1, repeat from *.
Row 2 - K1 make 1 K2 P1, *K2 P1, repeat from *
Row 3 - P all
Row 4 - 10 repeats Rows 1-3 until there are 8 knit stitches between the P stitches.

Row 11 - 22 *K2 P1 for 2 rows, P one row; repeat from *.  Ending Row 22 with a P row.
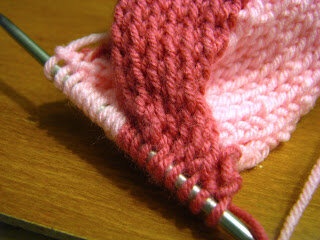
There should be 8 Purl rows or the length needed to reach your lowest thumb knuckle.

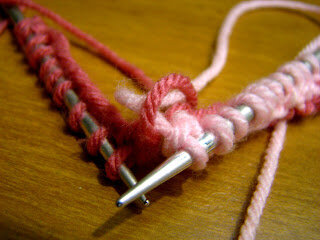
Slip these 10 stitches (1 P, 8 K, 1 P) onto a stitch holder.

CO 4 stitches on to finished-stitches needle.  Continue working, P1 *K2 P1 & continue in pattern [Row 1 & 2: K2 P1; Row 3: P] until it reaches 7 P rows above the thumb hole or your second finger knuckle.

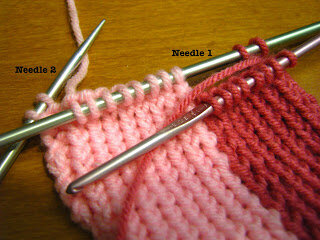
Decrease every first K row.  SSK, P1 *K2 P1 for 15 stitches.  K2tog P1.  SSK. P1 *K2 P1 for 15 stitches.  K2tog P1.
Continue regular pattern for rows 2 & 3 until there are 16 stitches remaining.  Kitchener stitch the top closed.

Thumb
Slip the holding 10 stitches onto one double point needle.  Pick up 9 stitches around top of thumb hole.

K around for 2 rows, P third row.  Repeat for 6 rows or until length splits knuckle distance.

*Row 7: SSK, K around to last 3 stitches, K2tog, K1.
Row 8: K row
Row 9: P row
Repeat from * until 11 stitches remain.  Kitchener stitch closed.

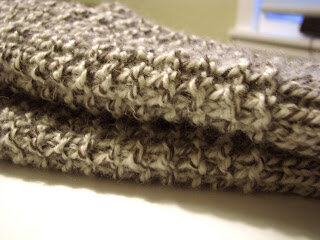
Weave in ends & model :]

Complete!
And displayed with thumbs in the center, per a Lithuanian quirk.

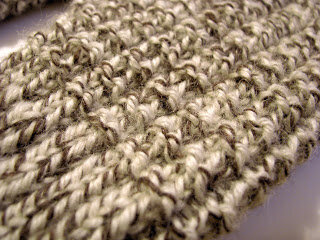
*My favorite part of the whole process is discovering this new pattern.  Try making a swatch and feeling the little nubby pattern yourself.  Amazingly fun!

Granny Squares!

Yay!  For once I actually stuck with a goal more than a day, haha.  I know I can be pretty flaky sometimes.  I think it is mostly due to my over-enthusiasm to do everything NOW.  Anyway, Granny Squares...


The last two waiting to be "squared" with white.

I brought a tote of leftover acrylic yarn from who knows how long ago to babysitting last week (I think there is still some little yarn balls that I had back when I *learned* to crochet at 7yr.  I definitely recognize them from some of my first creations...)


and I couldn't believe how quickly these little guys whipped up!


I think the "worse" part was switching colors all the time.  So at least I know I'm ready to try a little afghan like the one I posted about earlier.

Below is the pattern I'm currently following for this first project.  Maybe it'll end up in the shop, I'm not sure yet.

Pattern

And then, if I'm not too bored with the shell pattern (which my dad reminded me is the actual stitch pattern; granny squares are just the square) I'll be taking on this afghan next.


Can't wait!

Pink & White Swirl Scarf - a tutorial

Genevieve from SisterlyLove suggested a tutorial on the Pink & White Swirl Scarf so this is that attempt.  I apologize this is my first tutorial over the internet/with pictures so please be patient.  If you have any advice or suggestions, they are most welcome :)


Cast on 16 stitches for your cable, and as many stitches as you want along the side of it.  Note: I only had 2 stitches on either side and that wasn't enough to balance the twist of the cable.  I would recommend at least 4 stitches on either side if not 6, like I did in the Swirl Scarf (P2K2P2).


Knit in pattern.  For our purposes, let's say I had 4+16+4 stitches, so I would P4 K8.

Then I add my second color, with a slip knot, I go in my 9th stitch like I'm going to Knit and instead of yarning around, I pull the slipknot of my new color through the stitch.  


This helps to tide the tail of the new color.  Leaving the first color's string on its last stitch, continue in your new color K8, P4.

It should look like this when you're done with this row.


Turn, K4, P8.  Now you've returned to your first color.  Pull your last stitch snug (the lighter pink in my picture) and cross the strings.  I usually wrap the string that I'm picking up bottom to top or right to left around the string I'm dropping so as to hide it under my new stitch.  
(This took some remembering for me as it's been a while, so please excuse this picture, same wrapping technique, but switch the strings so the light is on top of the dark and the dark comes out under the right side of the lighter pink).


Once you've knit up enough rows that you are happy with, continuing to pull the meeting stitches tight & wrapping the strings between pick-ups, then we can start the cable row.  P4.


Move the next 8 stitches (the first half of your cable) off the needle to a holding needle (I use my crochet hook instead of a "cable needle").


For this cable, I want my first color to be in front of the twist, so I move the hook to the front.  Make sure your string is between the two panels so it doesn't leave a long string on the backside.


Continue K8 with your second color.  Normally you would pull your first stitch tight to avoid a gap, but since this is a different string from your other stitches, it won't matter here.  Just keep your first stitch snug as usual so it isn't extra loose.

Return your first 8 stitches to your needle to be worked. 


This is what it looks like right before starting the second half of the cable.  For the string you dropped (lighter pink), don't worry about wrapping it with the second (darker) color.  You will do that on your next row.


Making sure to use the appropriate color string, tighten your first stitch to avoid a loose stitch.  K8.  P4 (continuing with new color/ darker pink over the lighter pink).


Turn, K4, P8.  Wrap strings like before (drop first color, weave new string from under, out to the right side), and continue with second color; P8, K4.  Turn.

After you have continued in a few regular rows, the cable will become more visible:


Continue in pattern, weaving strings until you are ready to make another cable.  Repeat cable steps.  Before you know it, you'll start to have something like this:


Obviously it needs a little tweaking, but this is the basic design concept.  I hope you enjoyed it and if you try it yourself, I'd love to see/hear about it in the comments :)